You use Reference Tables during transformation processing to convert incoming values into values your system can use. You can view, edit, import, and export Reference Tables from within the CIC Cockpit.
- Viewing a list of Reference Tables
- Viewing the contents of a Reference Table
- Editing Reference Tables (add, edit, delete rows and columns)
- Importing a Reference Tab
- Updating an existing Reference Table
Viewing a list of Reference Tables
- Go to Integrations > Reference Tables. The Reference Table List screen displays a list of available Reference Tables.
Viewing the contents of a Reference Table
-
Go to Integrations > Reference Tables. A list of available Reference Tables displays.
Note: You can use the Search field to find a particular table.

-
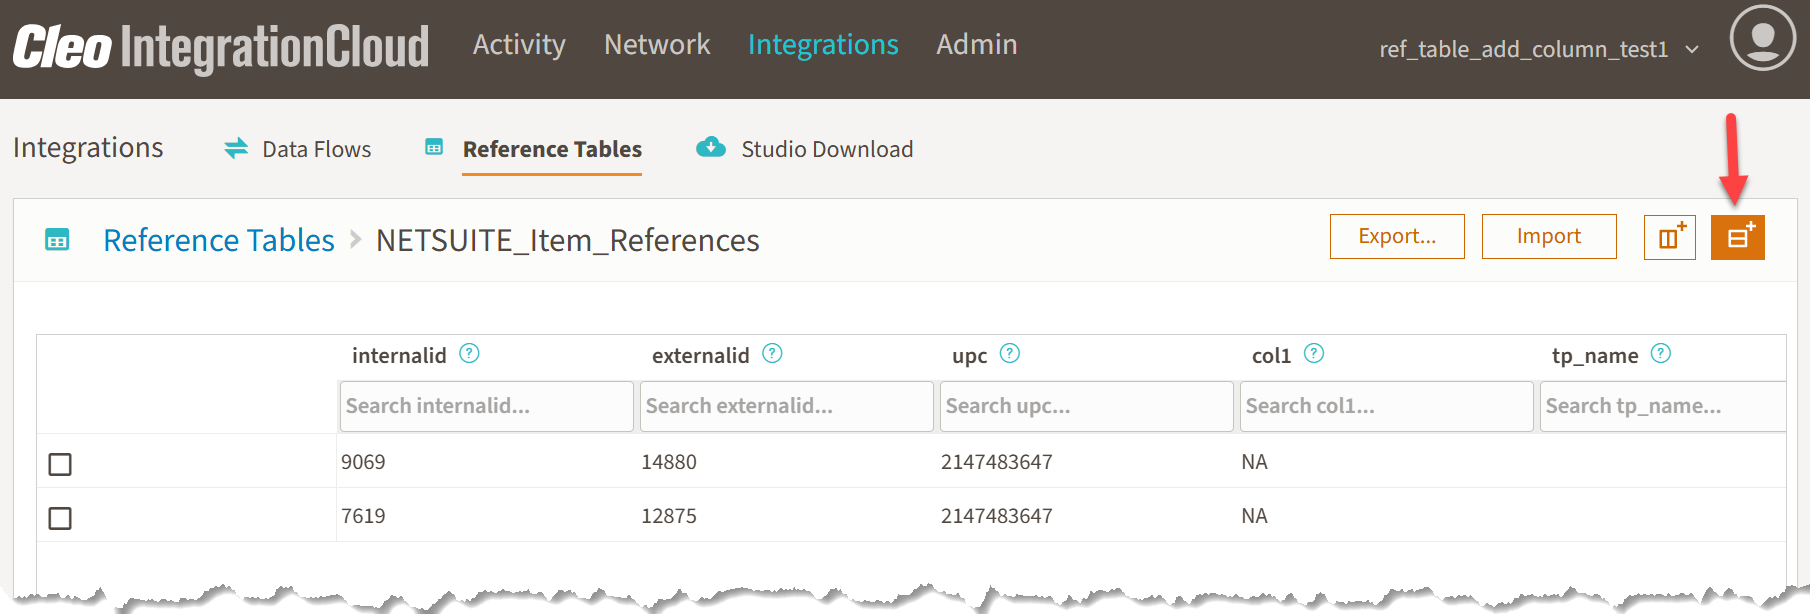
Click a table to open and view.
Table rows are displayed. You can hover over a column header to see information about that column.
From here, you can Add, Edit, or Delete rows. You can also add columns.
Editing Reference Tables
When a single Reference Table is displayed, you can add a row, edit a row, or delete one or more rows.
Adding a row
-
Click the Add Row button.
A new row is displayed.

-
Enter values for the fields as required and click the green check to
confirm
your update.

Editing a row
-
Hover over a row to display the Edit button and click it to enable fields in that row for editing.

-
Edit field values as necessary and click the Confirm button to save or the Cancel button to cancel changes.
CIC validates your edited values and returns errors as necessary. If validation produces an error, the row turns red and a question mark icon is displayed. Click the question mark icon to display information about the error.
Deleting rows
To delete a single row, do either of the following:
-
Hover over the row and click the Delete button.
-
Click the check box to select a row and then click the Delete button.
To delete multiple rows:
-
Click the check box at the top of the table to select all rows or click the check box next to the rows you want to delete and click the Delete button.
-
A confirmation dialog box displays.

- Click Delete in the confirmation dialog box.
Adding columns
You can add columns to an existing reference table using the Add Column button.
- Click the Add Column button, which displays a separate pane to add details.
- Add columns details, which include column name, data type, default value, and constraints.
- Column Name: Used to provide name of column. For example, SKU might be added.
- Data Type: Used to choose the type of data the new column will hold. This could be text, number, date, or other supported types, depending on what kind of values you expect for that column.
- Default Value: Used to create a preset value that is automatically assigned to a column when a new record is created, and no specific value is provided for that column. This is optional.
- Constraints: This includes Indexed or Nullable. An indexed column is one where a database index is created to speed up searches, sorting, and filtering operations on that column. A column is nullable if it can contain empty values (NULLs). This means that for some rows, you don’t have to provide a value for that column.
- Click Add to add column to reference table.
Importing a Reference Table
Importing a Reference Table requires data to be added to a spreadsheet of the same structure as the template file.
Import functionality allows you to:
- Create a reference table by importing a new reference table.
- Update a reference table by importing updates to an existing table.
Importing a new table
Use a downloaded sample file as a template for creating new Reference Tables. Once downloaded, you can enter data into the spreadsheet and import it back into your system to create a new Reference Table.
Downloading and populating a sample file
- On the Reference Table list page, click the Import button. The Import dialog box displays. Click Download Sample.
- CIC downloads a template spreadsheet file to your local system.
-
Open the file in Excel.
-
Enter a name for your Reference Table in the cell to the right of the Table Name cell. Enter a short description of the table in the cell to the right of the Table Description cell.
- Save your file.
Importing a new Reference Table
-
On the Reference Table list page, click the Import button.
-
The Import dialog box displays.
-
Browse to or drag and drop to select the file you want to import.
- Click Import in the dialog box.
-
The new Reference Table is added to the list.
Updating an existing Reference Table
To update an existing Reference Table, you export an existing Reference Table as a spreadsheet, edit the downloaded spreadsheet file, and import the file back into the system it came from as an update to the original Reference Table. Alternatively, you could import the edited file to another system.
Exporting an existing Reference Table
- On the Reference Table list page, click a Reference Table to display its data.
- Click the Export button. The Reference Table is downloaded to your local system as an XLS-formatted spreadsheet.
Note: Do not close the browser while export is in progress.
Importing an update to an existing Reference Table
- On the Reference Table list page, click a Reference Table to display its data.`
-
Click the Import button.
- Browse to or drag and drop the file containing the data you want to import.
-
Click Import.
- CIC replaces the data in your Reference Table with the data from the imported file.
About Reference Table Sample and Template Files
Cleo provides a sample spreadsheet file you can download and use as a template for creating reference tables. See Downloading and populating a sample file for information about downloading.
Rows 1-6 contain the following fields:
| Field | Description |
|---|---|
| Table Name | Name of the reference table to created |
| Table Description | Description for the reference table |
| Column name | Name of the columns to be created in the reference table. Column names must be all lowercase. |
| Data type |
Data type for the column. The supported data types are:
|
| IsNullable | Set this to true if the column allows null values. Otherwise, set it to false |
Starting in row 7, you can create indexes to columns. The first column in an index row should contain the index name. The index name should start with lookup_{tableName}_{indexName}. An example could be lookup_edi_code. In the same row under the respective column for which you want to add the index, set the value as key. In the example below two indexes will be created with index names lookup_edi_code (for column edi_code) and lookup_erp_code (for column erp_code). Make sure that index names being added do not already exist in the database.
Note: Leave one blank row between the end of the index rows and the Table Column and Table Data rows.
In the next row after the indexes, enter the name of the columns for which you want to set the data. A column called cicSerialId is created by default and you add new columns after that.
Note: Please make sure that the order of the column names here match the order in row 4. Also, if additional columns are added here that are not present in row 4, the additional columns will be ignored.
Troubleshooting Reference Tables
This section provides information about common errors and issues, and possible solutions.
- The spreadsheet used to import must be structured exactly as defined by the template file. See About Reference Table Sample and Template Files.
- Ensure table name is included in the spreadsheet.
-
If you get an error,
ERROR: relation “{Table Name}” exists already, make sure that table name in the spreadsheet does not already exist in the database. -
In case of
Failed to create index Error relation “lookup_column” already existserror, use a different index name. See About Reference Table Sample and Template Files for information about naming indexes. -
In case of
Table metadata mismatch error, check for the following scenarios:- Make sure the column names and their order in row 4 match those in the data section.
- For existing tables, make sure the column names in row 4 match your database table.
-
Make sure the number of columns (excluding
cicSerialIdcolumn) in row 3 equals the number of columns in your data section.
-
When you encounter a
Column data format mismatcherror, check that the values in your data section match the data types you specified in row 5. For example, if row 5 defines a column as integer, make sure you're not entering text in that column. -
In case of a
Failed to insert data, please check for the following scenarios-
Violated primary key rules by either:
- Using the same value twice in a primary key column
- Leaving a primary key column value empty
-
Left required fields empty
- Any column with IsNullable marked as False must have a value
- You cannot leave these fields blank
-
Violated primary key rules by either:
- While importing data to an existing table, please ensure that data type is not modified in the spreadsheet
- When specifying data types in row 5, you must use one of the supported column types
- In case the auditor log shows Out of memory error, please reach out to support
For other issues, please refer to Auditor Logs in CIC Studio.
Comments
0 comments
Please sign in to leave a comment.