A Server Cluster defines Clarify Servers utilizing at least three environments (physical or virtual), but always in an odd-numbered configuration, such as 3, 5, 7, etc. This supports distributed server architecture, multi-queue capability, configurable load balancing, and process prioritization.
Resources that are installed include a shared workspace, server install, and several system services that perform separate tasks in order to accommodate increased performance. Together, these resources will share, assign, and process jobs among the different machines in the distributed Clarify Server Cluster environment.
Installing a Clarify Server Cluster includes running an executable, and other important setup and configuration steps; these include providing your own PostgreSQL database, setting up shared environments/directories to be used in your cluster, as well as post-install configuration that takes place on each Server Node (the actual physical or virtual machines) in the cluster.
The following information walks you through this process and breaks down each phase as follows. Please review all information before starting the server cluster installation.
Getting started
Before you install and begin using the Server Cluster, please have access to the following:
- Common directory created and shared (with symbolic links to all server locations); for Linux, shared and drive permissions.
- A supported PostgreSQL Database (not part of the server install process).
- IP addresses or Domain Name info for all machines in the Server Cluster.
- Domain user credentials with administrative privileges; for Linux, the install must be run as the Clarify user, from the terminal.
- Clarify Server Install Executable file (provided by Cleo).
- License (needed post-installation).
Note that the specifics of your implementation may require more resources than outlined here. Please review the minimum system requirements. Consult your Customer Account Manager or Technical Support for more information.
The following information shows the entirety of the server installation process. Each stage contains specific details and steps. Please review carefully.
Pre-Installation: Setting up your environment
Creating a shared or host directory is a prerequisite step that must be done before installing the Server Cluster. This directory will be created and configured so that it gives shared permissions to all of the Server Nodes (physical or virtual) within the Cluster. Additionally, domain users with administrative privileges must be made available to run the install.
Create an installation directory and enable sharing
Create a folder to hold the Server and Share, and Database (if you prefer) directories created during the install process. An example could be: C:\SHARED
The actual Server Cluster will be installed to this directory (containing the Clarify_6_Server and Clarify_6_Share directories). The PostgreSQL Database folder (containing the database) may or may not be within the host directory as well, depending on your specific Cluster configuration. Please refer to the Guidelines for using your PostgreSQL Database with Clarify for more details.
The installer creates a Cleo directory, by default. Based on the example above, it could be C:\SHARED\Cleo
- (For Linux) The Cleo directory must be owned by the Clarify user and with full permissions. The permissions of the Clarify_6_Server and Clarify_6_Share will be handled by the install, and will not have to be explicitly set.
- The local user for Clarify should be explicitly added to the shared/host folder and given full control.
- This directory must have sharing permissions with all other machines in the Server Cluster.
- Do not run virus protection software over the above directories. (Turn off if running)
Create a Domain User with Administrative privileges
(For Windows)
- The Server Cluster install executable must be run as an Administrator (or user under an Administrator Group).
- Create a domain user that will be used to run and manage the Server Cluster.
(For Linux)
- A domain user is required. The user must already exist before installation.
- The install must be run as the Clarify user, from the terminal.
Create Symbolic Links
Symbolic links are a special kind of file that points to another file, much like a shortcut in Windows or a Macintosh alias. Unlike a hard link, a symbolic link does not contain the data in the target file. It simply points to another entry somewhere in the file system.
(For Linux) You must use a mounted drive. This makes the particular filesystem
accessible at a certain point in the Linux directory tree. Symbolic links
are created with the ln command. For example, the following would create
a soft link named link1 to a file named file1, both in the current directory.
$ ln -s file1 link1
(For Windows) This example shows how to create a symbolic link using a command prompt.
Create symbolic links to C:\SHARED on each machine that will be part of the Server Cluster.
- Start a command prompt as an administrator
- Run the command mklink /D <link path> <target path>
For example:
mklink /D C:\SHARED \\172.16.7.5\SHARED
Make sure Windows Firewall is off (or configured properly) for each machine.
Additional notes:
- Please keep in mind what directory you are in within the command prompt window, as the symbolic link will be created in that directory.
- Verify that you can view the resources within the folder after creating the symbolic link.
- This is only applicable to machines other than the one where the actual share exists.
Ensure certain power-saving settings have been disabled.
Default power save settings on Windows servers may disable network adapters; doing so will cause Server Cluster performance to be interrupted.
Always make sure that the power save settings for network adapters (on all servers) are disabled. This can usually be done through the Device Manager.
Install the Server Cluster (server component)
The next part of the install process establishes the Server Cluster – the actual server component.
You will need to know the following information before starting.
- Number of Cluster Server components: This is defined by your specific licensing agreement. This includes Server Nodes, Active Servers, and Concurrent Processes that comprise a Server Cluster. Please contact Support if you need to add or modify node settings.
- Path to the Database: Specify the database connection information for the machine where you have installed the PostgreSQL Database.
Install Procedure
The following steps take place during the installation process.
- Launch the install: Locate the executable file.
- Introduction: Read all instructions and recommendations.
- License Agreement: Read the License Agreement. Click the I accept the terms of the License Agreement radio-button to enable the Next button.
- Choose Server Installation Type: Select Server Cluster from the radio button options and click Install.
-
Choose Server Cluster Install Location: Named
Clarify_6_Server by default, this is the actual Clarify
Server
install, which contains resources required by the Server Cluster.
o This directory must be part of the Host or Shared directory.
o Enter the Symbolic Link path to the Shared directory, not the network/UNC path to that location. -
Choose Server Cluster Shared Artifact Location:
Named
Clarify_6_Shared by default, it is used as a common
workspace
by all Server Nodes.
o This directory must be part of the Host or Shared directory.
o Enter the Symbolic Link path to the Shared directory, not the network/UNC path to that location. -
Configure the Server Cluster Components: Enter
the
number
of Server Nodes, Active Servers, and Concurrent Processes to
be used
in your specific Cluster. Please note that your licensing agreement
correlates
to the number of workers you can implement.
- Database Location for Server Cluster: Specify the database connection information for the machine where you have installed the PostgreSQL Database. Please refer to the Guidelines for using your PostgreSQL Database with Clarify for more details.
- SMTP Server: If intending to use Clarify to generate email, you must provide the SMTP Server IP address and port.
- Review the pre-installation summary before installing. Click Done to complete the installation.
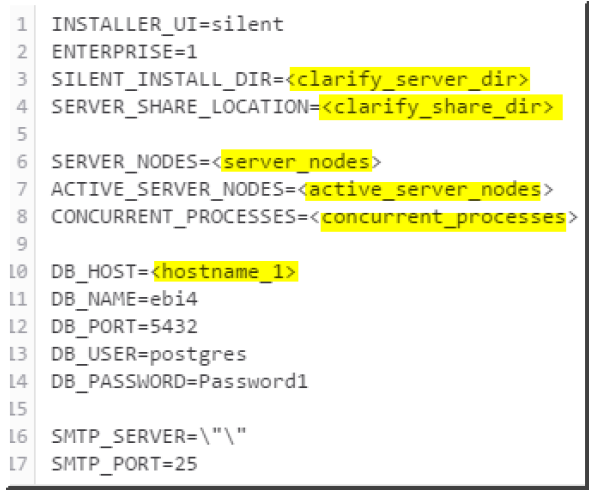
Silent Install Procedure
The Server component can be installed silently on both Windows and Linux.
Please have the following resources available. Cleo recommends that both are located in the same location. The required file is available on your Support Portal on cleo.com. Please contact Support if you require assistance.
The server.cluster silent file must contain the correct properties, as highlighted in this example.
To Install:
Run the OS-specific command from the location of the installer and file:
For Windows:
start /w <Clarify_Installer.exe> -i silent -f server.cluster.silent
(For Linux)
./<clarify_installer.sh> -i silent -f server.cluster.silent
Always confirm that the installs ran successfully. Errors stop the installation immediately. A log file (Clarify_Install_Result.log) can be found in the installer's home directory (if the installer is 'root', then the file is in /root).
Configure nodes.yml
The Clarify_5_Server/tools directory contains an important file - nodes.yml - which requires certain parameters specific to each Server Node in the Cluster. These parameters must be added to the file before further configuration can begin.
These parameters, required for each Server Node in the Cluster, include:
- hostname
- netinterface
- address
Obtaining this information can be done using common command prompt methods, such as nslookup, ipconfig/ifconfig, etc. This example shows a completed file for a Cluster with three Server Nodes.
Clarify-common
The Clarify-common section of the nodes.yml file lists parameters that are common across all Server Nodes in the Cluster. These specific paths must point to the symbolic link path being used. Do not use the network/UNC path. Parameters are listed below and shown as they may appear in the completed section.
Parameters:
Install: The fully defined path to Clarify_6_Server Share: The fully defined path to Clarify_6_Share Tools: The fully defined path to clarify-tools* User: The qualified user name with permission to run the services for each Server Node. Pass** (Windows only): The password for the qualified user noted above.
*Clarify-tools
The clarify-tools folder contains resources used by the Cluster to run locally on each Server Node. Each Server Node will automatically contain this folder after running the clarify_node_setup. The parameter to be entered for tools needs to be a local path on the Server Node. This path must be accessible by the Cluster; however, it cannot be within the SHARED folder. **Important Note for Window Users – must set password (“pass”) The user parameter in the clarify_common section of the nodes.yml file contains an additional password parameter (“pass”), which cannot be left empty. Both user and pass parameters are used as part of system log on configuration for the Cluster services, shown in the example below.
If you were to remove the user and pass parameters from the nodes.yml file (not recommended), you would be required to manually set the appropriate user and password on each service on each server node in the Cluster, after completing the clarify_node_setup. Note: Windows Local Security Policy may need to be configured to allow this user to Log On as Service, which is needed in order to start the cis-conductor service and prevent the services from shutting down if/when you log off from the system.
Set up Services on each Server Node (Run clarify_node_setup)
Once you have completed the installation of the Server Cluster, you will run clarify_node_setup from each server node in your Cluster. This script sets up two important system services that are used to manage jobs and clients, run evaluations, and create task allocations across all server nodes in your Cluster - mostly all behind the scenes!
cis-conductor: This service manages the lifecycle of Server Cluster components.
clarify: This service is used to gracefully shutdown a particular Server Node w/out impacting the state of the other nodes in the Cluster. This is normally used for maintenance or planned shutdowns.
The _clarify_node_setup_ can be found in the Clarify_4_Server\tools folder (on the share accessible from each Server Node)
(For Windows) This must be launched from the command prompt. Using an elevated command prompt (Run as Administrator), run the clarify_node_setup on each Server Node in the Cluster. The command prompt window should appear like this:
Note: To use verbose logging, you can add “--opt -v” as a parameter. This will echo logging information within the command prompt. For example:
C:\Share\Clarify_4_Server\tools>clarify_node_setup.exe –opt -v
(For Linux) The following takes place on each server node in your Cluster.
- Run the clarify_node_setup This must be run as the user who installed the Cluster; the user with access to the common directory (the same user that is defined in the .yml). The terminal should appear like:
- Run install-conductor-services.sh (located in the clarify-tools directory, on each server) This must be run as superuser or user (the same user that is defined in the .yml) with permissions to install services. For example, the command that the user would run would look like: sudo ./install-conductor-services.sh
Configure Recovery Settings on the Clarify Service
This next step sets the services (clarify and cis-conductor) to restart in case of failure. For Windows, this must be configured from the Recovery tab on the properties screen for each service.
- From the Task Manager, go to and open the Services dialog.
- Open the clarify service.
-
Set the computer’s response for when/if the service fails.
a. First, second, and subsequent failures set to Restart the Service.
b. Recommended restart attempts are every 2 minutes. - Click Apply and close the screen.
- Repeat these steps for all services (clarify and cis-conductor) in the Server Cluster.
For Linux: The above settings are default for the services. No configuration is required.
Start the Server Cluster Nodes (Starts Server Cluster)
Starting the two services for each Server Node, in this order, actually starts the Server Cluster.
- cis-conductor (for each Server Node)
- clarify (for each Server Node)
For example: if you have 3 Server Nodes in your cluster, you should start
the
cis-conductor service on all nodes, then start the clarify service on
each node.
For Windows, using the Services interface on the Task Manager to start the services is recommended.
For Linux, starting the services can be done using System Control:
- Run `sudo systemctl start cis-conductor`
- Run `sudo systemctl start clarify`
Comments
0 comments
Please sign in to leave a comment.